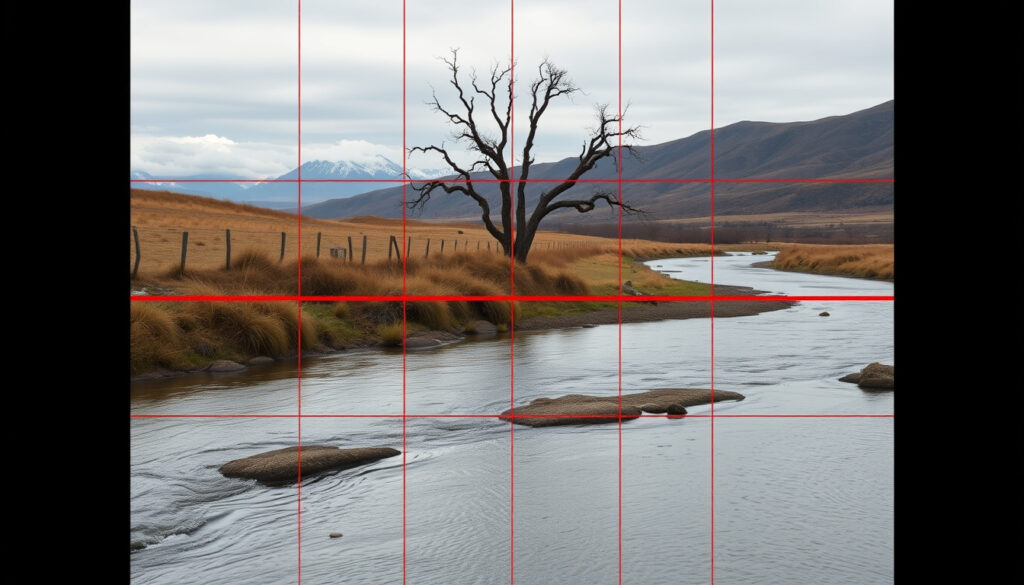
Rule of Thirds Photography: How to Use and Break It
The rule of thirds is a simple grid-based guideline that instantly improves the balance and interest of your shots, whether you’re using a DSLR or a smartphone. This guide walks through how to use the grid, when to ignore it, and common mistakes that trip up beginners.
Grid divisions: 9 equal parts (3×3) ·
Camera grid overlay: Available in most DSLRs, mirrorless, and smartphones (Adobe) ·
Subject placement tip: Eyes along top horizontal line for portraits (Dave Fuller Photography)
Quick snapshot
- Divides the frame into nine equal parts using two horizontal and two vertical lines (Photography Life)
- Placing subjects on grid intersections creates tension and interest (Digital Photography School)
- Grid overlay is standard on nearly all digital cameras and smartphones (IxDF)
- Whether the concept originated from painting or photography
- Whether the rule of thirds is directly derived from the golden ratio
- The exact percentage of professional photographers who regularly use it
- First described in writing by engraver John Thomas Smith in his 1797 book Remarks on Rural Scenery (historical record, widely cited)
- Learn when to break the rule for symmetrical or minimalist compositions
- Practice by taking multiple shots of the same subject with different placements
Five key facts, one pattern: the rule of thirds is a guideline, not a law — and its power comes from knowing when to apply it and when to step away.
| Fact | Detail |
|---|---|
| First documented | 1797 by John Thomas Smith (engraver) — widely referenced historical fact |
| Grid lines | 2 horizontal, 2 vertical |
| Number of intersection points | 4 |
| Camera grid availability | Nearly all digital cameras and smartphones (Adobe) |
| Purpose | Create visual tension and interest by placing subjects off-center (Digital Photography School) |
How do I use the rule of thirds?
Using the rule of thirds is straightforward once you understand the grid. The idea is to break your frame into nine equal boxes and then place your most important elements on the lines or where the lines cross. Photography Life (a leading photography resource) explains that this off-center placement naturally draws the viewer’s eye and makes the image feel more dynamic.
Enable the grid on your camera or phone
Most cameras — from DSLRs to the latest iPhones — let you turn on a 3×3 grid overlay in the viewfinder or on the screen. Adobe (a top-tier software and photography guide) recommends enabling this feature before you shoot so you can see the composition in real time.
Position key elements on the intersection points
The four spots where the grid lines meet are considered the strongest places to put your subject. Digital Photography School (a well-known education platform for photographers) advises placing your main subject on one of these intersections to create more energy than a centered composition would.
- For portraits: align the subject’s eyes with the top horizontal line. Dave Fuller Photography (a tutorial blog) emphasizes that this placement keeps the focus on the face while leaving breathing room.
- For landscapes: decide whether the sky or the land is more important, then place the horizon along the top or bottom horizontal line accordingly. This is a classic workflow ( Dave Fuller Photography ).
Align horizons with the horizontal lines
A common beginner mistake is centering the horizon dead in the middle of the frame. Instead, shift it up or down to follow one of the horizontal grid lines. IxDF (the Interaction Design Foundation, a respected educational body) notes that this simple adjustment gives more weight to the area of the scene that matters most.
Use the rule of thirds for different genres
The rule applies across photography genres: portraits, landscapes, street photography, even food shots. Frederic Paulussen (a photography blogger) notes that the technique is also widely used in design, film, and painting — it’s not limited to still photography.
Practice using the grid until it becomes intuitive. Adobe suggests a “rule-of-thirds field trip” where you deliberately take multiple good pictures using the technique, training your eye to spot natural grid placements.
Bottom line: The rule of thirds is a starting point, not a rigid formula. Beginners gain the most by turning on the grid, placing subjects on intersections, and aligning horizons — but the real skill is knowing when to ignore it.
The implication: mastering the grid gives you a foundation, but the real skill is knowing when to leave it behind.
When not to use rule of thirds?
The rule of thirds is powerful, but it’s not universal. Adobe (the software company behind Photoshop and Lightroom) points out that a small subject may actually work better centered than forced onto a grid line. Knowing when to break the rule separates a good photographer from a great one.
Symmetrical compositions
If your scene is perfectly symmetrical — a reflection in a lake, a building shot head-on, a row of pillars — centering the subject emphasizes that balance. The rule of thirds would break that symmetry and weaken the effect. Photography Life (a trusted educational site) notes that centered compositions can be just as compelling when used intentionally.
Minimalist or centered subjects
In minimalism, a single subject placed dead center can heighten feelings of isolation, calm, or focus. Forcing it into a third would distract from the simplicity. Adobe advises that very small subjects may feel lost when pushed to the edge; centering them keeps the viewer’s attention locked.
Abstract or pattern-based photography
Patterns, textures, and abstract shots often work best when they fill the frame evenly. Dividing them into thirds can interrupt the rhythm. The grid can actually work against the repetitive flow that makes pattern shots satisfying (based on common compositional practice).
When breaking the rule creates a stronger effect
Many professional photographers intentionally break the rule for dramatic impact. Ansel Adams famously said there are no rules for good photographs, only good photographs (attributed). The catch: you need to understand the rule first before you can break it effectively.
The rule of thirds trains you to avoid the center. Yet the most iconic images often violate it. The key is intention — break the rule because the composition demands it, not because you forgot to turn on the grid.
Bottom line: Symmetry, minimalism, and patterns are natural rule-breakers. Centered subjects can be more powerful than off-center ones when the scene calls for balance or isolation.
The pattern: knowing when to center is as valuable as knowing when to use thirds.
How to use and break the rule of thirds in photography
Mastery means knowing both sides of the coin: using the grid for solid compositions, and then consciously stepping away when it gets in the way. Adobe recommends taking multiple shots — one centered, one following the grid, one extreme — so you can compare later.
Master the basics first
- Turn on the grid. Most cameras and phones have it in the settings.
- Identify your main subject before framing.
- Place the subject on one of the four intersections.
- Check the horizon alignment.
This simple workflow from Dave Fuller Photography (a practical tutorial site) gives beginners a reliable structure to build confidence.
Experiment with extreme placements
Once you’re comfortable, try pushing the subject even further toward the edge of the frame. Leaving large negative space on one side can evoke emptiness, anticipation, or loneliness. Adobe notes that filling the frame can work too — even when parts of the subject are close to the edge.
Combine with leading lines
Leading lines — roads, fences, rivers — can guide the viewer’s eye even when the main subject is off-grid. The rule of thirds and leading lines work together: place the vanishing point on an intersection for maximum pull.
Use negative space to your advantage
A large empty area on one side of the frame (like a big sky or a blank wall) can emphasize the subject’s scale or isolation. The grid helps you judge how much space to leave. Adobe advises that leaving space on one side of the subject improves balance and visual interest.
“The subject can be placed on the left or right according to the proportions of the grid.”
— IxDF
“The technique is also widely used in design, film, and painting.”
The takeaway: the grid is a tool, not a master.
Is the rule of thirds useful for beginners?
Yes — and it’s often the first composition technique taught in photography courses. Digital Photography School (a well-established resource) says it gives new photographers a clear, repeatable framework to improve their shots immediately.
Why beginners benefit from a clear guideline
When you’re just starting, you’re overwhelmed with exposure, focus, and lighting — composition can feel vague. The rule of thirds provides a concrete rule: place your subject here, not there. That simplicity helps beginners see improvement fast. Adobe notes that practice with the grid helps the technique become intuitive over time.
Potential pitfalls of relying too heavily on the rule
The danger is that beginners may apply it to every shot without thinking. Over-reliance can produce predictable, formulaic images. Frederic Paulussen warns that strictly following the grid can kill spontaneity.
When to move beyond the rule
Once you’ve internalized the grid, start experimenting. Take a shot with the subject centered, then with it on a third. Compare. Train your eye to see why one works better than the other. That’s when you grow from rule-follower to artist.
What are common mistakes when using the rule of thirds?
Even experienced photographers can slip up. Here are the most frequent errors, sourced from Adobe (professional photography guides) and Photography Life.
Placing the subject too close to the edge
Pushing the subject onto an intersection is good, but if it’s too near the frame edge, it can feel cramped or cut off. Adobe notes that filling the frame works — but only when the subject isn’t accidentally truncated.
Ignoring the background
A well-placed subject means nothing if the background is cluttered or distracting. The rule of thirds doesn’t excuse you from checking what’s behind your subject. Photography Life emphasizes that the grid helps with foreground placement, but the background still needs attention.
Forcing every shot into the grid
Not every photo benefits from the rule. Forcing it leads to unnatural, awkward compositions. Adobe explicitly advises that a small subject may work better centered than forced onto a grid line.
Neglecting to check alignment
Slight misalignment of horizons or vertical lines can ruin the effect. A horizon that’s not perfectly level — even if it’s on the right grid line — looks sloppy. Always double-check your level, especially when using the grid overlay. Dave Fuller Photography includes alignment as a key step in his workflow.
Beginners often treat the rule of thirds as a magic fix. It’s not. A technically perfect grid composition with a boring subject is still a boring photo. The rule enhances a good subject — it doesn’t replace one.
The catch: rules are crutches until you learn to walk on your own.
What’s confirmed and what’s still unclear
Confirmed facts
- The rule of thirds divides the frame into a 3×3 grid. (Photography Life)
- It was first described in writing by John Thomas Smith in 1797. (Photography Life)
- It is a composition guideline, not a strict rule. (Dave Fuller Photography)
- Many cameras include a grid overlay for composition. (IxDF)
What’s unclear
- Whether the concept originated from painting or photography.
- The exact percentage of professional photographers who regularly use it.
- Whether the rule of thirds is directly derived from the golden ratio.
- Whether the rule of thirds can be effectively applied to video composition.
For a deeper dive into practical applications, see this comprehensive guide with examples that illustrates the grid in action.
Frequently asked questions
Does the rule of thirds work for every photo?
How do I enable the rule of thirds grid on my camera?
What is the rule of thirds grid?
Can I use the rule of thirds in post-processing?
Is the rule of thirds the same as the golden ratio?
How do I practice the rule of thirds?
What is the best way to break the rule of thirds?
For photographers in New Zealand, mastering composition is just one part of the creative process. If you’re using action cameras like the GoPro Hero 13 or sharing your shots on Instagram, knowing when to apply the rule of thirds can dramatically improve your feed. The choice is clear: learn the grid so you know exactly when to step off it — or stay within it because the shot demands balance.
More related posts
 Best Birthday Gift Boxes NZ: Compare Top 5 Retailers
 Liverpool F.C. vs PSG Stats: Score, H2H & Key Figures
 Pacific Language Weeks 2025: Dates, Theme, & New Language
 Egg Salad Recipe NZ – Classic Curried Kiwi Guide
 Marble Coffee Table NZ: Buying Guide & Top Retailers
 Chicken and Mushroom Pie: Making It & 3 Common Mistakes to Avoid
 TP-Link WiFi Extender – Best Models Setup and Troubleshooting